The science to bread temperature: For those of you who are new here, this column is all about bread and how to make it at home.
If you haven’t already done so, start with our The Ideal Baking Bread Temperature. We previously discussed how to confidently and purposefully mix dough. Then we let our dough rise, practiced folding with intention, and discussed fermentation. We’ll be using a lot of the terminology from our previous posts throughout this article, so if anything is unclear, refer back to the entire series of breadmaking techniques.
But today is baking day, so we’ll talk about how to transform that basic, workhorse loaf into a gorgeous, chewy-crunchy-aromatically-hypnotizing marvel.
I enjoy baking. Baking is the process of transforming dough into bread, one of the world’s oldest and most important foods. It represents the culmination of all of our hard work and patience. Baking Day is like a love child of Science Fair Day, Feast Day, and Judgment Day. (There will be no judging here—only learning.) Baking is both magic and science.
Baking, on the other hand, is more than just a big party. We still have a lot of work to do as bakers. That’s why we’re going to talk about what equipment we need, how to score bread, what really happens inside our ovens during baking, and how those processes transform dough into bread today.
So, before we get into the specifics of loading our loaves into the oven, let’s talk about how we know when—the big WHEN—to load our dough into the oven, as well as what it means to properly proof bread.
Final Proofing
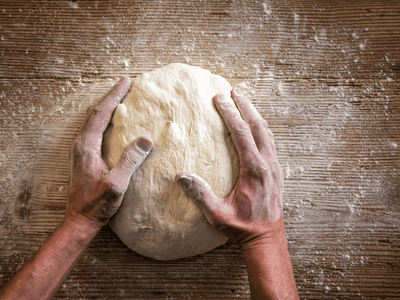
We’d just finished shaping our dough into boules and placed them in bannetons for their final rise, or proof, when we last left off. We then refrigerated them to allow them to proof more slowly (also known as retarding our loaves), which improved flavor and made them easier to load for baking. Looking at the above workhorse bread recipe, we can see that this dough needs a final, retarded proof of about one hour to 90 minutes.
But bread isn’t always willing to cooperate, and time isn’t really an issue here. Setting an alarm and napping would be too simple. What we need to learn as bakers is how to gauge the progress of our loaves and load them when the optimal balance of flavor and texture is achieved—open-crumbed but not pancake-like, nutty and aromatic but not too funky.
We can get an idea of what the yeast is up to here if we recall our previous post on how to make and proof bread dough. Since we finished mixing, our yeast has been feasting on sugars, releasing CO2 and fermenting our flour’s sugar into alcohol and other fun stuff. This process will continue until we bake.
During the final proof, our yeast is nearing the end of its food and oxygen supplies, which means that most of the work our yeast is doing is of the fermentation variety—in other words, flavor development.
However, yeast isn’t the only active ingredient here. Our flour-decomposing enzymes, amylases and proteases, are also having a good time. These forces will have a significant impact on the structure of the loaf. Gluten will continue to develop and organize itself up to a point, aided by the inflating effects of yeast respiration. If left indefinitely, the acids produced by the yeast and enzyme activity will begin to compromise the structure of the dough.
That was just a big can of worms, I know. To refresh your memory, read our previous post on how yeast works, which will help everything make sense.
In short, if we bake our loaves too early or underproof them, they will be less flavorful and will not rise to their full potential. We risk developing off flavors if we bake too late or overproof our loaves, and our loaves may be so inflated with gas that their gluten structure is unable to support them, resulting in loaf collapse during baking.
When Should You Bake?
So, how do we know when to start baking? We can begin to confidently determine this moment with a few simple tests and a lot of practice.
The Volume Examination
I always begin by inspecting my loaves. Volume is important. Our loaves should have increased in volume by at least half since we set them for final proof. If your loaves have doubled or more, we may be on the verge of overproofing.
Because judging the volume of our loaves can be difficult, I recommend using the same proofing baskets each time you bake until you get the hang of it. This will help you better understand what changes in volume may mean in terms of dough progression. I almost always bake 900-gram loaves of the workhorse recipe at the Cleveland, and I proof them in the same bannetons every day. This means that when my dough begins to rise above the lip of my baskets, we’re getting close to baking time.
The Feelings Test
Our dough has been inflating with gas since we finished mixing it. We organized our gluten as we folded and shaped our dough so that it would hold gas and maintain its shape during baking. When we bake, we want our dough to be fully inflated—all the way to the center of our loaves—but our gluten to remain in command.
In my experience, pressing on the center of the loaves with a lightly floured hand is the best way to judge this. Firmly but not aggressively push. If we’ve properly shaped our loaves, they should be able to withstand this. When you press the center of the dough, the edges should billow outwards, like a water balloon or overstuffed pillow.
Take note of how much your dough resists your hand. Even when underproofed, the dough’s exterior will always feel soft. To get the most lift during baking, we must ensure that the center of the loaf is also aerated. If the dough feels significantly denser in the center when pressed, it’s not time to bake. However, if the dough offers no resistance, you may be overproofing it and should bake it right away.
The Poke Examination
This is exactly how it sounds. Prick your loaf. (Boooop!) Your finger should leave an imprint, but it should bounce back and mostly disappear after a few seconds. If your finger does not leave an impression, the gluten is still very tight from shaping and your dough requires more time. If your finger leaves an indelible imprint, bake immediately.
If you’ve done these tests and your loaves are fully risen, pillowy but secure, and can withstand being poked around, it’s time to start baking.
Preparing the Oven
A home baker can set up their oven for bread in a variety of ways, some more effective than others. Place one of your oven racks as close to the bottom of the oven as it will go, and if you have a baking stone or Baking Steel, place it on that bottom rack.
On top of that, place your baking vessel in your large oven and preheat it to 500°F (260°C) for at least half an hour before you intend to bake.
Please keep in mind that in these photos, I’m using a cast iron combo cooker—a skillet and saucier set that locks together—with the skillet half on the bottom and the saucier serving as a cover. A standard cast iron, stainless steel, or enameled Dutch oven will suffice. (For recommendations, see our review of the best Dutch ovens.)
Bread ovens excel at two tasks that home ovens do not: producing ambient heat and retaining steam. Baking our bread in preheated Dutch ovens allows us to address these concerns and produce more delicious bread at home. In a future post, we’ll go over the entire oven setup process. I guarantee it.
*Notes from an equipment junkie: If you bought too many stones and such, you can store them on another rack at the top of your oven. If you have any spare cast iron, I recommend putting it in the oven as well. The heavier and more heat-conductive the items we place in our ovens during preheat, the more heat our oven will retain during loading. This will assist our loaves in rising tall and wide. The key to baking is heat. Let’s get it done.
Get to the Baking
Let’s take a quick moment to assemble our bread-loading equipment and prepare ourselves to work quickly, with our ovens preheating, full of heavy stuff, and our yeast pre-gaming for their last hurrah.
Step 1. Gather Your Resources
What will we require? Because our Dutch ovens will be extremely hot, begin by gathering your oven mitts and/or a large stack of dry towels. These will help keep us from overheating. Because most oven mitts aren’t going to cut it at 500°F, I use a pair of welding gloves. If you don’t have high-heat gloves, I recommend combining mitts and towels.
Fill your spray bottle halfway with water and place it on your counter. This will be used to generate steam inside our Dutch ovens. This will assist our loaves in rising and forming thick, crunchy crusts.
Finally, select your weapon. To score your loaves—that is, to slice open the tops before baking—you’ll need something very sharp and preferably very thin.
Razor blades and a lame (pronounced “laahm”), a double-sided blade designed specifically for scoring bread, are the industry standard. A box cutter with a new blade or a sharp paring knife will also suffice. In a pinch, a serrated knife will suffice, but it will not provide as clean a line as a thin, straight blade. (You can find our recommendations for both paring knives and serrated knives in our reviews of paring knives and bread knives.)
Step 2. Loading and Scoring Your Loaf
Remove one of your loaves from the fridge and bring it to your loading area while your oven is hot. Here, speed is crucial. Working quickly will result in larger, sexier bread. Before you start loading your dough, make sure you know what you’re going to do. Just keep moving if a cut comes out crooked. This is another instance where striving for perfection will harm the final product. This requires practice, and mastery will come with time.
Working quickly to prevent heat loss, take the bottom half of your Dutch oven and place it on your stove or other heat-resistant surface. Close the oven door to keep the heat in while leaving half of your baking vessel inside.
Flip your proofing basket carefully over the Dutch oven. Your loaf should flop cleanly and gently onto the cast iron surface.
Give your loaf surface a few spritzes with your spray bottle. To promote an even rise, approach your loaf from a variety of angles.
Then, using your scoring tool, slash your dough quickly and decisively. Ideally, you should slash the loaf from end to end, about half an inch deep. Take care not to overheat yourself here.
If you want your scores to pull back and form “ears,” keep your blade at a 30 degree angle to the surface of the dough. If you’re new to scoring bread, I recommend making two long, three-inch-apart scores across the dough surface.
Quickly reopen your oven and place your Dutch oven with the scored dough inside on the bottom rack, then secure the lid on top.
Set a timer for 15 minutes and close your oven. Then take a deep breath and prepare a drink for yourself. Excellent work, everyone. Your bread is now in the oven.
Step 3. Steam Exhaust
After 15 minutes of baking at 500°F (260°C), gently lift the lid of your Dutch oven for a moment to vent steam and heat.
Because of the design of home ovens, we want to vent this heat and steam from our baking chambers. See, most home ovens are built with baking elements on the bottom. This is why we built our baking chambers so close to the oven floor; being so close to the heating element allowed us to maximize oven-spring.
However, as we bake, and because oven-spring only occurs in the first 10 minutes or so of baking, our focus as bakers shifts from generating volume in our loaves to ensuring that our crusts form properly and our crumbs dehydrate and set.
Too much steam in the baking chamber will prevent crust formation; too much heat from a single direction in our ovens may cause our bottoms to burn before our loaves properly dehydrate and brown.
Replace the lid, reduce the oven temperature to 450°F (230°C), and set your timer for another 15 minutes. Continue to sip that cocktail.
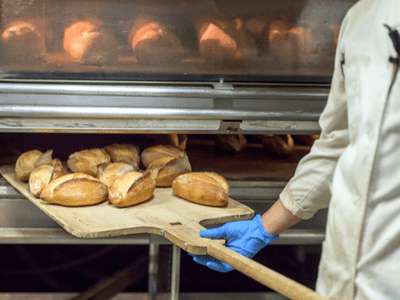
Step 4. Completing the Bake
After baking for a half hour in our covered Dutch ovens, it’s time to uncover the loaf and let the crusts color and the loaves dehydrate. This part of the bake usually takes about 15 to 20 minutes, depending on your oven and how dark you like your loaves.
To keep the bottom of your loaf from burning, I recommend stacking the bread-filled half of your Dutch oven on top of its lid, if possible. If that doesn’t work, insert another rack just above your stone and place your Dutch oven on top to provide some insulation from the directional heat coming from the bottom of your oven and stone.
So. You just finished baking the workhorse loaf. But what actually happened, and why did we do all of that? We’re about to get into chemistry for the uninitiated.
The Science to Bread Temperature
We all know that heat is required to make bread. But what exactly does heat do to dough? And how does it turn dough into bread? Let’s start with oven-spring and work our way up from there.
Oven-Spring
Until now, all of our love and attention has been focused on creating a happy environment for our yeast and gluten, allowing our dough to become inflated and gaseous. But, as many of us have discovered, the inflated dough balls we load into our ovens expand even more during baking. This final expansion of our dough is known as oven-spring. But what exactly causes oven-spring? A few critical points.
According to Emily Beuhler, author of, oven-spring occurs primarily during the first 10 minutes of baking. During these ten minutes, the yeast, sensing the approaching heat, accelerates fermentation and respiration, belching out a final burst of CO2.
What was dissolved in our dough’s water comes out of solution as the CO2 heats up. The CO2 in our dough expands as it heats up, just like any other gas. The same thing happens with the ethanol produced by fermentation and a portion of the water mixed into our dough—they evaporate and expand when heated. Because these gases are trapped inside our dough by the gluten matrix formed during the mixing and fermentation stages, they expand along with our bread.
This expansion is what causes our dough to leap upwards and outwards while baking. This is oven-spring, and we want as much of it as we can get.
But, if we want our dough to expand in tandem with the vaporized gases produced by our oven, why do we score our bread at all? Will that harm the oven-spring? I’m glad you inquired.
Scoring
In addition to making our loaves look nice, scoring serves an important purpose during baking. We want the trapped gases in our dough to expand during baking to create oven-spring, but we also want them to escape in a controlled manner before they expand too much, which could cause our gluten matrix to rupture and collapse before it has had time to fully set and hold its shape. Scoring is what allows for these controlled expansion and evaporation pathways.
Consider your loaf of bread to be a large net wrapped around thousands of small balloons. As the balloons inflate, they take up more and more space, and due to a phenomenon known as the square-cube law, the space they take up expands faster than the surface of your loaf (i.e., the net) can handle without either a) restricting their growth or b) causing some of them to pop.
Without scoring, the gases would escape, much like the dinosaurs in Jurassic Park. This is known as rupturing in the baking world, and it most commonly occurs in lightly scored and underproofed loaves of bread. Scoring solves this problem and allows our loaves to rise fully by creating channels for rapid growth (as well as controlled spaces for any excess steam or over-expanded gases to vent).
In terms of aesthetics, bakers frequently use different scoring patterns on their loaves, both to control final shape and as a sort of signature, a practice that dates back to communal ovens used by towns in Europe during the Middle Ages and afterwards.
In the photos, I’ve used what’s known as a pinwheel score, which opens up a similar portion of the dough surface as two straight scores and allows my coworkers at The Cleveland to tell which loaves are which. (With so many different types of bread floating around, I use scoring as a form of communication; our white bread is always a pinwheel pattern, which helps the line cooks know which loaf to grab in a hurry.)
I can hear you wondering, “What does steam have to do with any of this?” Here’s the lowdown.
Steam
During baking, steam performs three major functions. For starters, steam conducts heat much better than dough. As Harold McGee points out in, introducing steam into our baking chamber during the initial stages of baking allows the surface temperature of the dough to rise much faster than it would otherwise. This, in turn, allows the conductivity of the gases and water in our dough to heat up faster, all the way to the center of our loaves.
Second, while the steam quickly evaporates, the added moisture in our baking environment keeps the dough surface pliable, allowing oven-spring to occur with as little resistance as possible. Both of these processes result in more oven-spring.
Crust Formation, Caramelization, and the Maillard Reaction
The third effect of steaming loaves is crust formation, which returns us to heat transfer and is related to processes that anyone who has ever cooked or burned anything has experienced. When a crust forms on the outside of a loaf of bread, we’re effectively searing it, just like a chef would with a steak. This means that our starches are decomposing into simple sugars and caramelizing. Furthermore, the proteins in our gluten matrix are being broken down into simpler amino acids, which then recombine with other molecules in our dough to form thousands of other compounds that we refer to as delicious.
The latter are known as Maillard reactions, and because they occur at higher temperatures than caramelization reactions, they are responsible for the majority of the unique crust character and flavor of hearth loaves.* As for steam, the steam’s ability to expedite the transfer of heat to our dough’s surface results in a more pronounced system of Maillard compounds, resulting in a thicker, more flavorful crust.
*The temperature difference between baking hearth breads and baking challah or cookies accounts for some of the differences in their exterior texture. Both of these are baked at lower temperatures, where sugars caramelize quickly but proteins remain mostly intact.
Formation of Crumbs
Finally, when we bake bread, the starches in our flour—which, as previously stated, make up the majority of our flour—gelate, which means they absorb water and solidify. As Emily Beuhler and Harold McGee discuss, this process gives bread its final structure and constitutes the majority of what we eat. This process begins at temperatures around 140°F (60°C) and progresses to temperatures around 180°F (82°C). This part of the baking process is why it’s critical to let our loaves cool before slicing, or we’ll end up with gummy bread.
Yeast
They’re all dead by now if you’re baking bread as you read this. They died at around 140°F, but not before throwing a wild party. A toast to friendship!
Examining the End Product
So, how do we know when our loaves are finished? In general, bakers have three options: color, feel, and sound.
Color
Our crusts will continue to darken as Maillard and caramelization reactions take place. It’s up to you how dark you want your loaves to be. The darker the loaf, the better it will hold its crust and the stronger the flavor. I like to bake mine until they are very dark.
Feel
When your loaf has reached the desired color, remove it from the Dutch oven with gloved hands. It should be light in the hand. If it feels heavy but appears to have significant oven spring, reduce the temperature to 400°F (200°C) and continue baking for another 10 minutes.
Sound
Tap the bottom of your loaf while holding it. Your loaf is done baking when it sounds clearly thumpy and hollow. If the thumping sounds have been dampened and muffled, the loaf still requires more cooking time. As previously stated, reduce your oven temperature to 400°F and bake for another 10 minutes.
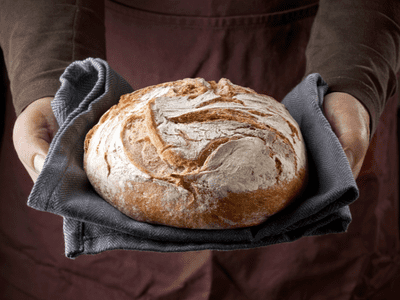
Conclusion
Congratulations on finishing your loaf! Set it aside to cool on a wire rack while you preheat the oven for your next bake. Also check out Bake Bread Temperature to see the exact numbers for the type of bread you’d like to make!
Everyone, have fun baking!