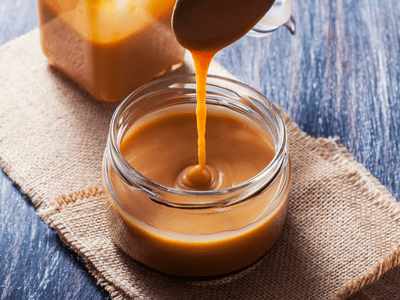
Making caramel from condensed milk: Most people’s favorite sweet topping is caramel, which is available in a variety of flavors. And if you have a can of condensed milk on hand, you can quickly make caramel to drizzle on your cakes, sundaes, and graham crackers.
I adore anything caramel-flavored, and nothing beats fresh, homemade caramel. I’ve tried a few different methods and will share which ones work best.
Whether you want to make freshly made caramel in 20 minutes or have all the time in the world, there’s a method for you. The best part is that most recipes call for only one ingredient: sweetened condensed milk.
Who’s up for making some caramel?
One of these great methods for turning condensed milk into caramel will satisfy your caramel cravings in a pinch.
Making Caramel from Condensed Milk

When making caramel from condensed milk on the stove, you have two options.
Using a Stove
The quickest way to satisfy your caramel cravings is to use your stovetop. Yes, a few extra ingredients are required for this method. But this isn’t always a bad thing. More ingredients equals more flavor, and who doesn’t want more flavor?
You’ll Need: Condensed Milk & Brown sugar.
How-To Manual:
Step 1: Bring the milk and brown sugar to a boil while constantly stirring.
Step 2: Reduce the heat to low and continue to cook for about five minutes.
Step 3: Remove the saucepan from the heat once the sauce has thickened.
Step 4: Combine all of the remaining ingredients.
As it cools, this recipe will harden. If you need to soften it up again, simply microwave it for 30 seconds.
Use within seven days of making and storing in an airtight container.
Unopened Can on the Stovetop (Classic Method)
If you prefer “classic” and “tried-and-true” methods, this is the one for you.
Did you know you can make caramel from an entire unopened can of sweetened condensed milk in a pot of boiling water? Yes, it’s true, and it’s the most common method of producing caramel from condensed milk.
Simply do the following:
Step 1: Remove the label from the milk can.
Step 2: Bring a saucepan of water to a boil. Make sure there is enough water to completely cover the can.
Step 3: Carefully lower the pan into the boiling water, making sure it is completely submerged.
Step 4: Bring the can to a boil for three hours. As needed, add more water.
Step 5: Carefully remove from the boiling water after three hours.
Step 6: Allow to cool before opening and enjoying!
Using the Oven
If you don’t want to constantly mix or add ingredients, the oven method may be a better option for you. To be successful, this method requires a single can of sweetened condensed milk and two pans.
Step 1: Preheat the oven to 425 degrees Fahrenheit.
Step 2: Empty a can of milk into a small dish or plate.
Step 3: Fill a larger dish/plate/pan with water to a height of 34 inches.
Step 4: Bake for approximately 75 minutes. If necessary, add more water during the baking process.
Step 5: Remove the milk from the oven when it has turned golden brown.
It’s not uncommon for a thin crust to form on the top of the pan when using this method. You can either discard the crust or use an immersion blender to combine the contents of the pan.
If you don’t use all of the caramel, keep it in an airtight container for a few weeks.
However, the crust may re-form in the refrigerator. So, skim it off or blend it into the remaining caramel sauce as directed above. Read more about Turning Condensed Milk Into Caramel Using the Oven.
Using the Microwave
If you’re really pressed for time and need caramel right away, you can always use the microwave. This is more difficult because it happens so quickly, and your caramel can quickly go from golden and tasty to burnt and awful.
Follow these (carefully) instructions to make caramel from condensed milk in the microwave:
Step 1: Place 1 12 cup sweetened condensed milk in a microwave-safe container and heat for one minute on high.
Step 2: Remove from the microwave and give it a good stir.
Step 3: Cook for an additional minute on high. Remove it immediately if it is about to spill over the bowl.
Step 4: Re-stir the caramel.
Step 5: Cook the caramel for another minute on 50% power. Make sure it doesn’t boil over again. Cook until the milk has turned a yellow/gold color.
Using Pressure Cooker
Pressure cookers are useful inventions that have recently received a lot of attention (despite the fact that they have been around for a long time). Follow these steps if you have an electric pressure cooker and want to make caramel from condensed milk:
Insert the trivet and steamer basket into the electric pressure cooker.
Step 2: Place the condensed milk can on top. Make sure it’s on its side but not touching anything in the pressure cooker.
Step 3: Fill the pressure cooker halfway with water, just enough to cover the can without going over the “max” setting.
Step 4: Close, lock, and cook for 15 minutes on high pressure.
Step 5: Turn off the “Keep Warm” option and let the pressure cooker release naturally.
Step 6: Allow the pressure cooker to cool overnight before using it.
Using Slow Cooker
Do you prefer slower approaches? If you don’t like the pressure cooker and prefer the low-and-slow appeal of a crockpot, try this method instead:
Step 1: Place two cans of sweetened condensed milk on their sides in the slow cooker.
Step 2: Fill the cans with water until they are completely submerged.
Step 3: Cook for eight to ten hours on “low.”
Step 4: Carefully remove the cans and set them on the counter to cool, or place them in a bowl of cold water to speed up the cooling process.
How does condensed milk become caramel?
Now that you’ve learned how to make caramel from condensed milk, you might be wondering, “What’s the deal with condensed milk?” So, how does it become caramel?
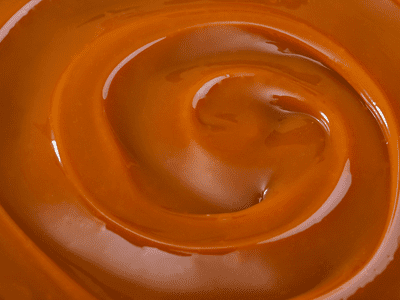
When condensed milk is boiled, it turns brown, resulting in the caramel that we all know and love.
Is it possible to turn evaporated milk into caramel?
According to Baking Nook, Like condensed milk, evaporated milk has had 60% water removed from the milk. So, you can still make the caramel if you only have evaporated milk and not condensed milk on hand. Boil the unsalted butter, brown sugar, and water, then add the evaporated milk.
How long does caramelized condensed milk last?
Caramel made from condensed milk (and nothing else) will keep in the fridge for two to four weeks, though you’ll probably eat it before it goes bad. Make certain that it is stored in an airtight container. You can also freeze to increase your longevity.
How do you know when your caramel sauce is finished?
The color is the easiest way to tell if your caramel sauce is ready. It will turn golden/coppery in color. The sauce will thicken as well. Remove it from the heat as soon as you notice the color and thickness. Otherwise, it may catch fire.
Keeping & Freezing
This sweetened condensed milk caramel sauce can be kept in the fridge for up to a month after it has been cooled, covered, and stored properly.
It freezes well as well. Store in an airtight container or plastic bag for up to three months. It then begins to form ice crystals. Allow it to thaw at room temperature until it softens. Defrosting in the microwave is not recommended.