How to control temp to cook bread in a dutch oven?
Many people, including myself, begin their bread baking journey at home by learning how to bake bread in a Dutch oven. Introducing steam in the home oven—a necessary component in bread baking—can be difficult, but a sealed pot makes the process simple and unobtrusive. During the first stages of baking, steam is released from the dough into the sealed pot, where it is trapped and kept moist. This humid environment allows the bread to rise quickly, resulting in a crisp and shiny crust.
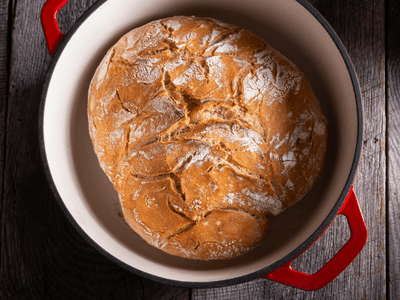
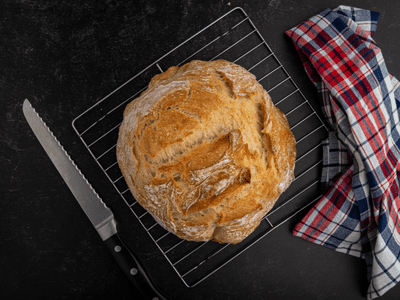
Bread baking in a Dutch oven
My method for baking bread dough in a Dutch oven is as follows:
- Preheat your home oven to 450°F (230°C) for 30 to 45 minutes with a Dutch oven inside.
- Use parchment paper to line a pizza peel, inverted baking sheet, or cutting board.
- Place your proofed bread dough on parchment paper (trim the paper to fit, if necessary)
- Mark your dough
- Return the preheated Dutch oven with the parchment paper and dough to the oven.
- Cover with a lid and bake for 20 minutes.
- Remove the lid from the oven after 20 minutes and continue baking according to the recipe (typically 25 to 35 minutes)
- When fully baked, a free-form loaf should have an internal temperature of around 205°F (96°C).
As with most baking recipes, you may need to adjust the baking time and oven temperature to suit your circumstances. Read more about Bread Baking Temperature in our blog!
Is it necessary to preheat the Dutch oven for bread?
Yes, I preheat my Dutch oven before baking bread dough in it.
When I bake bread dough in a preheated Dutch oven, I get the same oven spring and final loaf volume as when I bake bread dough in a cold Dutch oven.
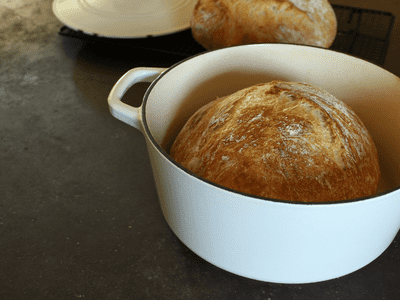
How does one remove a loaf of bread from a Dutch oven?
When your loaf is done baking, carefully reach down into the pot with oven-safe gloves to remove the bread. By this time, the crust will have hardened completely, so there is no danger of collapse.
Furthermore, if you baked your bread dough inside the Dutch oven on parchment paper, as I recommend here, you can lift the parchment paper corners to remove the baked loaf of bread.
The Advantages of Baking Bread in a Dutch Oven (or any sealed pot)
There are several benefits to using a Dutch Oven. A Dutch oven aids in increasing loaf volume.
When there is no steam in the oven during the first part of baking (when oven spring occurs), the rapidly expanding dough forms a hard crust on the outside. This early crust formation reduces oven spring and reduces overall loaf volume, resulting in a squat and dense loaf.
When sufficient steam is applied, the exterior of the dough remains moist and supple, allowing it to expand and stretch further before the starches gel and the crust hardens and sets.
It doesn’t take much steam to provide benefit. When the pot is sealed for the first 20 minutes of baking, the moisture that escapes from the dough creates the ideal environment for optimal loaf volume.
How do you keep the bottom of the bread from burning?
“When I bake bread in my Dutch oven, the bottom burns and becomes very thick; how can I fix this?” Even with the suggestions below, baking in a Dutch oven usually results in a slightly darker bottom. However, using one or more of these will significantly reduce the darkening.
My techniques for preventing the bottom of my loaf from burning when baking in a Dutch oven:
- Avoid baking bread dough in a Dutch oven on top of a baking stone.
- Reduce the oven temperature while it is preheating.
- Use a baking sheet, baking stone, or even a single sheet of aluminum foil to insulate the bottom of the Dutch oven.
- Before adding your dough, coat the Dutch oven with coarse corn meal or wheat bran.
- Place two sheets of parchment paper beneath the dough.
- When the dough is almost done baking, remove it from the Dutch oven.
Let’s take a look at each method for preventing bread dough from burning.
Avoid baking bread dough in a Dutch oven on top of a baking stone.
The first step is to make certain that you are not baking with your Dutch oven on a baking stone/Baking Steel. The stone and cast iron pot will be far too hot when the oven has finished preheating, resulting in scorched or burned bread.
Reduce the Oven Temp to Cook Bread without Burning it
The first option is to adjust your baking temperatures. Reduce the preheat temperature if the bottom crust burns or becomes too thick. Some of my recipes, for example, call for a 45-minute preheat at 450°F (230°C); you could reduce this to 425°F (218°C) for the preheat.
To help prevent burning, bake on two pieces of parchment paper.
As you may have noticed in a sourdough recipe, I usually use parchment paper (I love this natural, nonstick option) to help drag the dough into the scorching hot Dutch oven. Lay parchment paper over your proofing basket containing the dough and cut it to fit, as described in that recipe post. Invert the basket onto a pizza peel, slide the parchment into a hot Dutch oven, score the dough, and bake.
Follow the same steps as before, but this time layer two pieces of parchment on top of each other to help insulate the dough even more.
You can also sprinkle coarse corn (as discussed above) into the pan before dragging in the parchment with your dough. The corn will not stick to the dough this way, but it will help to insulate it and keep it from burning.
Remove the dough from the Dutch oven when it is almost done to avoid burning.
Another way to keep your bread dough from burning in a Dutch oven is to remove it once the crust has set, about 30 minutes into baking. This means the dough was baked for 20 minutes with the lid on (and steaming), then uncovered for 10 minutes.
By this point, the crust should be a pale golden brown and sturdy enough to gently remove the dough from the Dutch oven and finish baking directly on the oven rack.
At this point, remove both sides of the Dutch oven and the parchment paper and continue baking until done. Read our Parchment Paper vs Wax Paper for those of you who are interested!