Can you proof dough in oven? Sometimes when it’s cold outside, it’s kind of hard to proof your bread perfectly.
Baking simple yeast bread recipes is one of my favorite activities, especially when the weather begins to cool and I crave all of my favorite comfort foods. To achieve the nice and fluffy rise of yeasted bread, you must first learn the fundamentals of proofing bread dough.
In a nutshell, proofing dough is the final rise before placing it in the oven to bake. Keep in mind that yeast proofing and bread dough proofing are two separate steps. Proofing yeast is the process of starting the fermentation process by combining warm water, yeast, and a pinch of sugar. Proofing bread dough, also known as final fermentation, occurs when the dough is allowed to rise between 75 and 80oF. This can be done in a room temperature glass bowl, the oven, a slow cooker, or a proofing box.
4 Methods for Proofing Bread Dough
Here are four tried-and-true methods for proofing bread in both cold and warm kitchens. Once your bread has been proved, proceed to the next step to make yeast bread.
1) Room Temperature Proof
Bread is traditionally proofed in a glass bowl at room temperature. (If you want to make a specific shape, you can also use a proofing basket or a bread tin.) This route is ideal for warm and cozy kitchens, especially during the summer.
Cover the bowl with a damp paper towel or cloth to proof it. Use cling wrap if your bowl is deep enough. If you’re working with a particularly sticky dough, rub a tiny amount of oil onto some cling wrap to keep it from sticking (a spritz of cooking spray works, too).
Test Kitchen tip: When you place the dough in the glass bowl, mark the outside so you don’t have to guess whether or not it doubled in size.
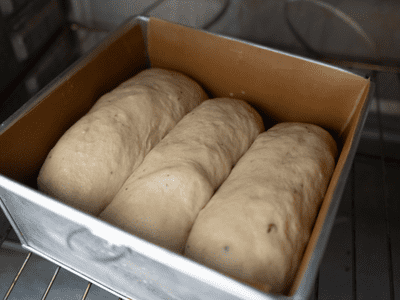
2) Proof Dough in Oven
You may be wondering if you can use your oven to proof bread. Yes, the answer is yes! When it’s a little chilly inside, we like to do oven proofing. And no, you will not be turning it on!
To proof on oven, place a glass baking dish on the bottom rack of the oven and fill it with boiling water to proof bread. Close the door and place your dough on the middle or top rack. The steam and heat generated by the boiling water will create a warm and steamy environment for the dough, which is ideal for a good rise.
If your bread requires a longer proof, I recommend refreshing the hot water every 30 to 45 minutes to keep things going.
3) Use a Slow Cooker to Proof Bread
Think you can’t get enough of your slow cooker? This appliance, it turns out, can be used to proof bread dough. Fill your slow cooker halfway with water and set it to low (this will heat the water to around 200oF). Turn the lid upside down, place a dishtowel on top, and place your bowl of dough on top. The radiant heat from the hot water will aid in the rise of the bread.
4) Make use of a Proofing Box
If you’re a serious bread baker, you should skip the homemade shortcuts and invest in a bread-making tool that aids in proofing. A proofing box will keep the temperature and humidity consistent inside, allowing you to get a perfect rise every time. This proofing box, with its ideal yeast-friendly environment, can also help you proof bread faster than at room temperature. That’s a huge victory for serious bakers! That means more delicious loaves in less time.
A Few More Unusual Proofing Techniques

While the oven and boiling water method is our favorite, there are a few other ways to proof bread when it’s a little too cold inside.
Set a heating pad on low heat, cover with a dishtowel, and place your bowl or pan of dough on top. This will add some extra warmth to your bread. To keep the outside of your dough from drying out, cover it with a tea towel or reusable wrap. You can also use a rice-filled heating pad (the type that you heat in the microwave).
If you’re a serious gardener, you can use a seed germination mat as well. For a nice rise, set the temperature to around 80oF.
Of course, you can also take an internal temperature reading with the oven light turned on. Some oven lights emit enough heat to convert the oven into a proofing chamber. Check the temperature with an oven thermometer after about 30 minutes. If your light can heat the oven to 75oF or higher, you’re in business!
Frequently Asked Bread Proofing Questions
What should you do with your flat, underproofed loaf? Or perhaps you need to leave the kitchen and want to slow down the proofing process while you’re gone? Allow us to help you with your troublesome bread proofing questions so you can get that beautiful rise in no time.
What should you do if your dough has not been properly proofed?
If your bread dough isn’t rising, the yeast may be past its prime, or the water temperature may be off (too hot and the yeast will die; too cold and the yeast will not grow). Always use fresh yeast and get a thermometer to help your yeast do its job. In no time, you’ll have a perfect loaf of homemade bread.
Place your bread on an oven rack (while the oven is turned off) and place a pan of hot water underneath the rack. If your kitchen is cold, the warm steam will wake up the yeast and help it along.
How do you deal with overproofed dough?
Overproofed dough can be repaired by kneading and pressing the air out of the dough. Then, reshape your bread and place it in your preferred proofing container. Allow it to proof as usual before baking.
How can I prevent my bread from proofing?
You can prevent bread from proofing by placing it in a cold place, such as your refrigerator. Colder temperatures will cause the proofing process to take longer.
Do you score bread before or after it has been proofed?
After proofing, always score the bread. Otherwise, the scored cuts in your bread will explode.
Bake Our Coziest Yeast Breads Today!